
Original image
step 1 of 10
Open the car.

step 2 of 10
Duplicate the background layer, name it 'find edges'. Then go to
Filter-Stylize-Find Edges.
Filter-Stylize-Find Edges.

step 3 of 10
Duplicate the 'Find Edges' layer, rename it 'halftone pattern',
then go to Filter-Sketch-Halftone Pattern.
(Pattern type-dots,increase the size a bit and lower the contrast a bit).
Apply according to your needs.
then go to Filter-Sketch-Halftone Pattern.
(Pattern type-dots,increase the size a bit and lower the contrast a bit).
Apply according to your needs.

step 4 of 10
Create a new layer and make a radial gradient from colors : #d6b879 to #d3a38a.
After that change the blending mode to "Linear Burn".
After that change the blending mode to "Linear Burn".

step 5 of 10
Create a Levels Adjustment layer. Settings :
Mode : RGB, Input levels : 0, 1.00, 170.
Mode : RGB, Input levels : 0, 1.00, 170.

step 6 of 10
After that create a Color Balance Adjustment layer. Settings
Midtones : Color Levels : +74, -39, -5.
Midtones : Color Levels : +74, -39, -5.

step 7 of 10
Create a new layer and make another radial gradient from colors :
#f1ead9 to #e1d0bd. After that change the blending mode to "Color Burn".
#f1ead9 to #e1d0bd. After that change the blending mode to "Color Burn".

step 8 of 10
Now, create a Curves Adjustment layer. Settings :
Input : 148 and Output : 112.
Input : 148 and Output : 112.

step 9 of 10
Now, duplicate the main Background Layer, bring it to the top.
And change the blending mode to "Saturation".
And change the blending mode to "Saturation".

step 10 of 10
After that create another Levels Adjustment layer.
Settings : Mode : RGB, Input levels : 0, 1.00, 192.
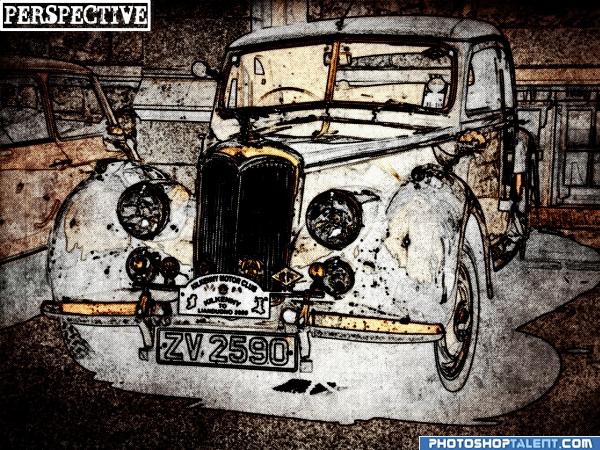
Step 11 : Add some text and give it a border by using the Rectangular Marquee Tool. Use Paper Textures to get a more washed out look.
Settings : Mode : RGB, Input levels : 0, 1.00, 192.
Step 11 : Add some text and give it a border by using the Rectangular Marquee Tool. Use Paper Textures to get a more washed out look.

Final result
Pxleyes
Photography and photoshop contests
We are a community of people with
a passion for photography, graphics and art in general.
Every day new photoshop
and photography contests are posted to compete in. We also have one weekly drawing contest
and one weekly 3D contest!
Participation is 100% free!
Just
register and get
started!
Good luck!
Follow us:


© 2015 Pxleyes.com. All rights reserved.