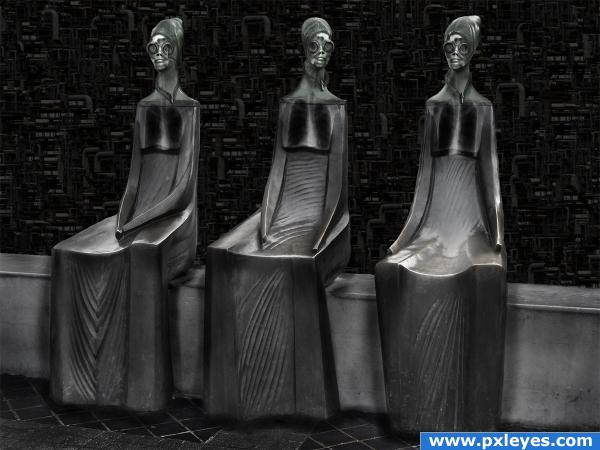
A Work in Progress: New Giger Beings


This guide was made for entry:
New Giger Beings
In Contest:
three ladies


Original image


step 1 of 41

First Take the Wiki photo of Birth Machine from HR Giger
and even though low quality you can use the image - so chop out the entire alien guy and then you will need to duplicate the head area and flip horizontally and merge the two pieces to start the shape for the head area of your 3 women

Creation of New Giger Beings : Step 1
sources used for this step:

step 2 of 41

Here is the part of the head from above that needs to be duplicated and then we will sit the image under one of our women to start the head and face area. Dont be afraid to stretch the head to fit as we will just use the low quality image to make the head and then do some smudging and liquefying soon

Creation of New Giger Beings : Step 2

step 3 of 41

here we are erasing around the head by masking the 3 women layer

Creation of New Giger Beings : Step 3

step 4 of 41

Creation of New Giger Beings : Step 4

step 5 of 41

Creation of New Giger Beings : Step 5

step 6 of 41

Creation of New Giger Beings : Step 6

step 7 of 41

Now to make the eye glasses portion we will take a round shape and start with two of them one for each eye

Creation of New Giger Beings : Step 7

step 8 of 41

Next take a duplication of the black circle and make it white by dumping some of the white paint bucket on it and this will give you your shape for the eye pieces to start

Creation of New Giger Beings : Step 8

step 9 of 41

Once you have the two pieces together you can go in and bevel the round pieces and give them a gradient overlay this will be the onset of the eye pieces

Creation of New Giger Beings : Step 9

step 10 of 41

Next i just added in some custom curves to darken it up a bit and just inversed it and painted in what I wanted

Creation of New Giger Beings : Step 10

step 11 of 41

Now for the next step I went in a did a liquefy with a pinch to start to make the glasses a bit round and to give me a bit of a guide for chopping out the center.

Creation of New Giger Beings : Step 11

step 12 of 41

Once i had my pattern I used the Elliptical marquee tool to cut and delete out the center piece

Creation of New Giger Beings : Step 12

step 13 of 41

once you have your centers chopped out you can give them a bevel to make them a bit more rounded

Creation of New Giger Beings : Step 13

step 14 of 41

Here I did a bit more on the liqufy for around the eye areas

Creation of New Giger Beings : Step 14

step 15 of 41

Here is the face in the starting point and I just used a lot of liquefy tool and lots of smudging with some drawing to gain the mouth and nose areas

Creation of New Giger Beings : Step 15

step 16 of 41

Next I needed to make some of the semi rounded holes for the glasses portion so I first chopped out a portion of a screw head of a door to use for them and then just duplicated a bunch of them and merged them all together

Creation of New Giger Beings : Step 16
sources used for this step:

step 17 of 41

Creation of New Giger Beings : Step 17

step 18 of 41

Creation of New Giger Beings : Step 18

step 19 of 41

I just used the free transform tool to set the indents where I needed them

Creation of New Giger Beings : Step 19

step 20 of 41

Ok next using the round shape again I made the round black image for the inside of the glasses

Creation of New Giger Beings : Step 20

step 21 of 41

Then I just chopped out a piece from the black round piece to give the glasses more depth and just brought down the opacity a bit and did some desaturation

Creation of New Giger Beings : Step 21

step 22 of 41

Again I did more liquefy tool to shape the face a bit more around the glasses part

Creation of New Giger Beings : Step 22

step 23 of 41

Once I had done one face I then chopped it out and opened up a fresh source image and set the face under the source image and duplicated it 2 more times for each face

Creation of New Giger Beings : Step 23

step 24 of 41

Creation of New Giger Beings : Step 24

step 25 of 41

I added in the pictures from cg-textures for the x-rays for the chest area

Creation of New Giger Beings : Step 25
sources used for this step:

step 26 of 41

Once I had my 3 faces underneath I erased via masking the three faces in with the original

Creation of New Giger Beings : Step 26

step 27 of 41

Next i used a coil from cg-textures to make the coiled neck portion for each of the women - it was on a metal door then I just desaturated it and used the free transform and mask erased to fit

Creation of New Giger Beings : Step 27
sources used for this step:

step 28 of 41

Creation of New Giger Beings : Step 28

step 29 of 41

Creation of New Giger Beings : Step 29

step 30 of 41

Next I need it to come down to a bit of a point but be in a smooth look so I isolated the area with the rectangle marquee tool and just used my smudge tool to adjust

Creation of New Giger Beings : Step 30

step 31 of 41

Creation of New Giger Beings : Step 31

step 32 of 41

Next using the shape tool I chose an arrow and gave it some bevel and a gradient overlay for the bottom portion of the coiled area

Creation of New Giger Beings : Step 32

step 33 of 41

Creation of New Giger Beings : Step 33

step 34 of 41

Creation of New Giger Beings : Step 34

step 35 of 41

And last I used a picture of a pipe and free transformed and masked out some of the parts not needed and adjusted one of them for around the eye piece on the first woman

Creation of New Giger Beings : Step 35
sources used for this step:

step 36 of 41

Creation of New Giger Beings : Step 36

step 37 of 41

I desaturated the pipe area and adjusted for the eye piece

Creation of New Giger Beings : Step 37

step 38 of 41

Then very last added in the pipe area and gave it another coil to blend into the bottom side coil.

Creation of New Giger Beings : Step 38

step 39 of 41

For the Background I deleted out the current scene and just added in some pipes from a factory from cg-textures and just went in and made a pattern with it

Creation of New Giger Beings : Step 39
sources used for this step:

step 40 of 41

Here is the outcome of the pattern from a portion of the factory

Creation of New Giger Beings : Step 40

step 41 of 41

Then very last just some clone for the flooring, and some burn and dodge for around the rest of the areas.... and to give a bit of a green tint I used some curves and desaturated the women image and when I inverses with the curves in greenish tint I then just colored in the green with a soft brush.

Creation of New Giger Beings : Step 41

Final result

Creation of New Giger Beings : Final Result

LOGIN or REGISTER FOR FREE
to rate this guide and create your own guides.