
Original image
step 1 of 9
Open Point Lobos image. Open Man image.
Use a selection tool to select the middle fisher from Point Lobos image. Copy and paste it into the Man image.
Use Edit>transform>Scale and/or Warp and/or Rotate to make the fisher fit the man's back the way you would like.
Use a selection tool to select the middle fisher from Point Lobos image. Copy and paste it into the Man image.
Use Edit>transform>Scale and/or Warp and/or Rotate to make the fisher fit the man's back the way you would like.

step 2 of 9
Add a Vector Mask to Fisher layer. Use a soft brush set at 40% Opacity to mask out the edges around the fisher to make it blend in with the man's back.
Hide the Background layer. Merge Visible.
Hide the Background layer. Merge Visible.

step 3 of 9
Use your prefered selection tool of choice to select the man.
Copy and Paste him back into the image.
Select the Background layer. Select Filter>Blur>Gaussian Blur. Set it high to blur out the background. The man layer should be in focus.
Copy and Paste him back into the image.
Select the Background layer. Select Filter>Blur>Gaussian Blur. Set it high to blur out the background. The man layer should be in focus.

step 4 of 9
Create a New Layer. Select Filter>Render>Clouds.
Select Filter>Blur>Radial Blur.
Place center in middle of image. Set ammount to 100 and Blur Method to Zoom.
Select Filter>Blur>Radial Blur.
Place center in middle of image. Set ammount to 100 and Blur Method to Zoom.

step 5 of 9
Create a New Layer.
Select Gradient Tool. Select Radial Gradient. Select the black to gray to black gradient. Select a dark blue.
Start from the center of the image and draw the line out to the edge.
Select Gradient Tool. Select Radial Gradient. Select the black to gray to black gradient. Select a dark blue.
Start from the center of the image and draw the line out to the edge.

step 6 of 9
Select the Wings in the Wings image. Copy and paste them into the Man image.
Select the Lasso Tool to cut one wing into its own layer.
Use a soft, dark, red brush Set to about 20% opacity to brush around the base of the wings.
Select the Lasso Tool to cut one wing into its own layer.
Use a soft, dark, red brush Set to about 20% opacity to brush around the base of the wings.

- : source
step 7 of 9

step 8 of 9
Use a small Star Brush that comes with PS. Select the brush parameters: Scattering, Color Dynamics, Other Dynamics. Drag the brush in a circle around the man on Man Layer.
Under Adjustments Select Gradient Map. Select "Steel Bar."
From top to bottom, layers in this order:
Tattoo Layer
Blue Swirl Layer
Wing Layers
Gradient Map Layer
Man Layer
Cloud Layer
Blurred Background Layer
Under Adjustments Select Gradient Map. Select "Steel Bar."
From top to bottom, layers in this order:
Tattoo Layer
Blue Swirl Layer
Wing Layers
Gradient Map Layer
Man Layer
Cloud Layer
Blurred Background Layer

step 9 of 9
Here is the original uncut photo of the man.

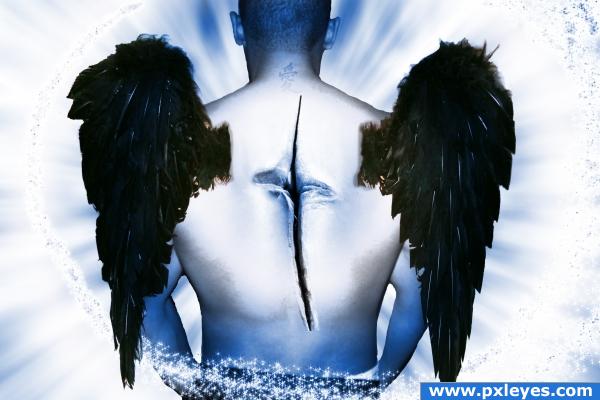
Final result
Pxleyes
Photography and photoshop contests
We are a community of people with
a passion for photography, graphics and art in general.
Every day new photoshop
and photography contests are posted to compete in. We also have one weekly drawing contest
and one weekly 3D contest!
Participation is 100% free!
Just
register and get
started!
Good luck!
Follow us:


© 2015 Pxleyes.com. All rights reserved.