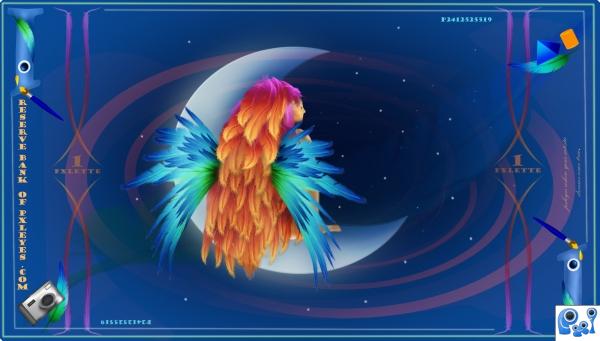
A Work in Progress: artistic dreams note.


This guide was made for entry:
artistic dreams note.
In Contest:
pxl notes


step 1 of 4

create rectangle and fill with blue.

( to create red twirl you first need to create leaf)

MAKING OF LEAF:
Gradient setting: 5573BA 55DFCA 119312

use PENTOOL to create a long egg shape/oval and fill with gradient. ( you could also create a circle and use warp tool to create a similar shape)

Select SMODGE TOOL> and smudge edges of the shape to create feather strands. drag and pull motion.
Smudge one long strand to create point at the bottom of feather.

EDIT>TRANSFORM>WARP . warp shape to create natural feather shape -- bend.


TO CREATE RED TWIRL>
Duplicate leaf

FILTER>BLUR>TWIRL setting MAX.

Twirl leaf until you get a nice swirl shape.
set LAYER BLEND MODE to EXCLUSION.
add a LAYER MASK. B&W gradient to mask out centre of twirl .

duplicate twirl layer and EDIT>TRANSFORM>FLIP HORIZONTAL.

( depending on your twirl you may need to go back to blue rectangle - select- then go to each twirl layer and delete any twirl that has extended past the rectangle. )


TO CREATE NUMBER 1>

Select FONT. your choice of type and size.
Create number one in blue colour.

SELECT> BURN BRUSH setting SOFT
Burn edges of number to give a 3D effect.

Creation of artistic dreams note. : Step 1

step 2 of 4

TO CREATE 8 RED STRANDS THAT FRAME ENDS OF NOTE:

Create another leaf layer:
Invert leaf IMAGE>ADJUSTMENTS>INVERT
Add soft twirl to leaf. FILTER>BLUR>TWIRL ... low setting

duplicate this image 8 times and apply.. EDIT > TRANSFORM>HORIZONTAL/VERTICAL.. flips to shapes and position on note.

duplicate ORIGINAL LEAF: 2 more times.

This time we are going to position them around the number ones we have on the note. Fip / WARP leaf to wrap around the numeral. Use BURN on the numeral to give a shadow. BURN SETTING 15-20%

TO CREATE 3 D SHAPES>

TRIANGLES:
use PENTOOL> create triangle. FILL with gradient dark colour bottom. light colour top.
Create another triangle ..perspective to horizon. fill with same gradient.

Cylinder.

create 2 circles . select PENTOOL. create a line from the edge of top circle to the bottom circle. continue along and connect bottom circle edge to the top circle. close shape.
you should have one rectangle and two circles.

Fill with orange. position shapes bottom circle, rectangle , top circle. add dodge to the top circle to add highlights. burn edges very lightly on the retangle give a more rounded 3d shape.

Creation of artistic dreams note. : Step 2

step 3 of 4

TO CREATE PAINT BRUSH.

Use PENTOOL to create handle shape. ( once again you can create a circle and stretch/warp) Fill with blue.
Select handle add new layer. Apply Gradient overlay. blue white blue. .. LAYER BLEND MODE> OVERLAY . you can warp the gradient if needed ..alternative is to BURN and DODGE to create shadow and highlight.


METAL PART>
create rectangle , fill with gradient ..silver/ grey - White- silver/grey. LAYER BLEND MODE >NORMAL.

BRUSH BRISSLES
create rectangle. fill with brown.
DODGE & BURN - stripes to create brissles.
EDIT>TRANSFORM>WARP to create brissle shape.
If you wish to add paint. add new layer Use PENTOOL to trace over end and fill with paint colour.

Drag Brissle layer BELOW METAL layer.


CAMERA:

create rectangle. fill with silver grey.
select rectangle. create new layer
fill with gradient. B W B. LAYER BLEND MODE > OVERLAY
EDIT> TRANSFORM>WARP gradient to produce light . shadow. mine is similar shape to an S.

create small rectangle full length of the side of camera . fill with darker grey. select , add new layer, fill with gradient.
Lower fill of layer of gradient to 45%

camera center : create circle fill light grey, contract fill darker grey. contract fill with almost black.
apply either gradient or dodge burn for shadows and highlights.

FLASH AND VIEWER
create rectangles. fill one with dark grey fill one with
gradient . layer blend mode . normal.

to give camera a 3D effect. burn left and right sides of camera. Add a small rectangle to the top of camera and fill with almost black. you can dodge to add a few highlights.

Creation of artistic dreams note. : Step 3

step 4 of 4

ok putting it together.

blue rectangle.

Enlarge one feather and set to overlay for background

twirled and flipped feathers. setting exclusion

number 1's in corners

8 inverted feathers lightly twirled. positioned . 4 on the right , 4 on the left. text 1 pxlette in diamond shape created by feather positioning.

place original feathers over number ones and burn shadows.


CONTINUES:

TO CREATE SKY EFFECT.

create an oval. fill with a dark purple. FILTER> BLUR>GAUSSIAN. MEDIUM SETTING. CONTINUE TO BLUR until it blends. remove any extra spread that has gone pass main note shape.


TO CREATE STARS.

Small hard brush. size 5. make small white spots randomly. duplicate layer.
on the lower layer FILTER>BLUR> GAUSSIAN, low setting , just enough to produce a glow.


TO CREATE MOON.

Make Circle , fill with a soft blue colour.
erase large portion of moon with hard brush
duplicate and blur the same as stars.

I added a few soft blurred purple to my moon just to blend in with the rest of image.

LITTLE FAIRY
a circle for head.
I cant draw so i did a squiggle shape for arm , and leg.
then connected to the head. erased enough to make a neck shape.

to create a face . burn features and then created a small eye.
blue circle , a smaller black circle and a couple of white spots.


TO CREATE WINGS>

get original feather. create a virtical row of 6 feathers. merge layers.
duplicate feather layer. EDIT >FREE TRANSFORM and drag feather to the right just past where the dark blue ends.
make these feathers a little smaller and add a couple more feathers resized.
create a 3 layer of feathers using the same method.

Duplicate ALL 3 feather rows and merge.
EDIT> TRANSFORM>WARP to create lower wing.
( i warped the top wing to give a little shape also)

Merge all layers of feather wing.
Duplicate and Flip horizontal.


FAIRY HAIR:

ONCE AGAIN GET 1 ORIGINAL FEATHER.
INVERT: IMAGE> ADJUSTMENT>INVERT

(with wings in postion. ) start from the BOTTOM of the fairy.

layer inverted feathers , duplicate and aline , similar to wings. continue until you have created hair. Warp top feathers to cover head.

SMODGE feather ends to create hair like strands.


security secrets:

add serial numbers to note: P ... the rest of numbers equal alphbet reference number for letters. eg: 5= E 24 =Y
The word PXLEYES is hidden amoungest the stars. in a dark blue, light fill layer. which can be seen in high res.

Creation of artistic dreams note. : Step 4

Final result

Creation of artistic dreams note. : Final Result

LOGIN or REGISTER FOR FREE
to rate this guide and create your own guides.

Votes


uservoted
LEEBAOREN
Score:
10