
Original image
step 1 of 9
Using only the source image, I started by selecting out one of the coconuts and cutting it in half and creating a symmetrical coconut by joining two copies of one of the halves. This in the component that I used for the entire piece.

step 2 of 9
You will want to make 3 copies of the symmetrical coconut. One for the snout, one for the base of the head, and one to use for creating a custom brush for the fur. You will then start with the warp transform to create your shapes for the snout and the base of the head, this will take time and patience to get them just the way you would like them to be.I then applied a hue and saturation adjustment layer on each layer, pulling the saturation all the way to the left creating grey scale

step 3 of 9
The next step in this one involves some air brushing with a soft edged brush in differing shades of grey. I varied the opacity in this step so that I could build up the details the way I wanted it. You will proceed with this in your own way, to get what results you want.

step 4 of 9
After you have the head and snout the way you want it, you will think it looks a bit naked so now it is time to create your custom brush. Take a copy of your coconut and do a threshold adjustment on it to create a really strong black and white contrast.

step 5 of 9
You will then go to select, color range and choose color with the eyedropper in the whitest area of the coconut. Once you click ok, you will return to your threshold layer with a selection in place. Create a new layer and then fill the selection with black. Keep the selection in place and go up to edit and down to define custom brush, naming it whatever you want. This will be your fur brush.

step 6 of 9
You are now ready to add fur to your gorilla. Using your custom brush and a variety of greys and blacks, apply fur strokes however you would like your gorilla's fur to look, making sure to change directions of the brush in different areas to make it look natural as you can. Construct different layers in order to be able to edit it as you go.

step 7 of 9
I painted in some eyes in a layer between the head layer and my airbrushing. It is difficult to instruct you how I did it but I did use the natural color from the coconut and added translucent layers above it until I was happy with it.

step 8 of 9
Now I cut a plank shape out of the center of one of the coconuts and stretched it out to fit the canvas from top to bottom. You will make enough copies of this inverting every other one until you have covered the entire canvas.

step 9 of 9
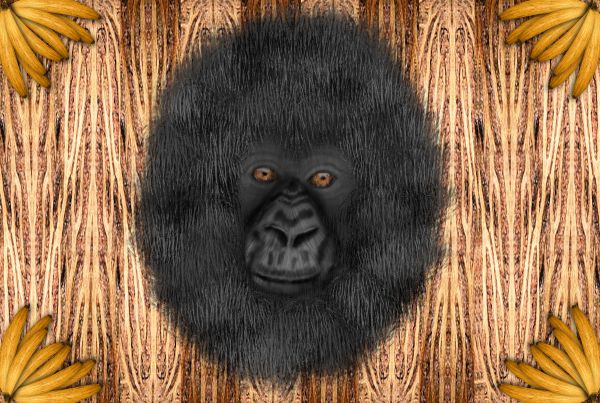
This next step was just an afterthought for me, but here is how I created a banana from the coconut we used for everything else. I transformed it into a long oval shape. With that done, I started with the warp transform and worked with it until I was satisfied with it's shape. Using a hue and saturation adjustment, I changed the color to a banana yellow. the dark areas I just painted on with a soft brush and black with about 50% opacity. Once done, I copied it 3 more times varying the size and created the bunch. I turned the bunch into a smart layer and proceeded to duplicate and place in the corners of the canvas. This was fun to create, really challenged myself to see how many ways I could make use of the coconut.

Final result
Pxleyes
Photography and photoshop contests
We are a community of people with
a passion for photography, graphics and art in general.
Every day new photoshop
and photography contests are posted to compete in. We also have one weekly drawing contest
and one weekly 3D contest!
Participation is 100% free!
Just
register and get
started!
Good luck!
Follow us:


© 2015 Pxleyes.com. All rights reserved.