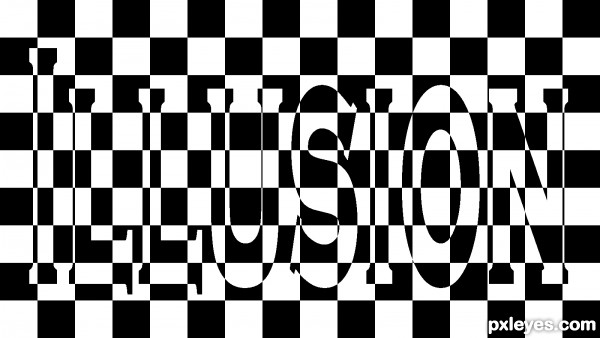
A Work in Progress: Checkered Illusion


This guide was made for entry:
Checkered Illusion
In Contest:
optical illusions


step 1 of 19

1. In this guide, I will show you how you can create a simple illusion using the checkered board pattern. I would say that this guide is more for the beginner to Photoshop, rather than the intermediate. To start, open a new canvas. For this entry I made the canvas 1600 x 900 px. Then open another canvas to 100 x 100 px.

Creation of Checkered Illusion: Step 1

step 2 of 19

Using the paint bucket tool, fill the smaller canvas with black.

Creation of Checkered Illusion: Step 2

step 3 of 19

Then, select the move tool and drag the black square to the main canvas. Then drag to the corner. You will notice that the black square will automatically adjust to the correct position to the canvas corner.

Creation of Checkered Illusion: Step 3

step 4 of 19

You are now done with the smaller back square canvas and you can just close it out. The next step is to zoom in on the main canvas to get a better view of the black square. (Hint: you can zoom in and out of your canvas by holding down the alt key and using the mouse scroll wheel)

Creation of Checkered Illusion: Step 4

step 5 of 19

The next step is to duplicate the square, to checkerboard your canvas. To do this quickly and easily, use the move tool once again and click on the black square layer and while holding the Alt key, drag the black square layer. This will duplicate the layer for you and you can position the second black square to meet corners.

Creation of Checkered Illusion: Step 5

step 6 of 19

Continue to repeat the previous steps until you get a row of black squares in a checkered pattern like shown below. (Remember, corner to corner is the easiest way to make sure your checkered pattern is correct.

Creation of Checkered Illusion: Step 6

step 7 of 19

Rather than duplicating the same square over and over again, we are going to merge the checkered pattern into one layer. This will save you a lot of time and eliminate the need for all the extra layers. First, go to your layer pallet and click the eye icon next to your blank layer. Then select anyone of the black square layers.

Creation of Checkered Illusion: Step 7

step 8 of 19

Once you have a square layer selected, go to the "layer" drop down menu and select "Merge Visible". This will make it so your checkered square layers become one, as you can see from the layers pallet to the left.

Creation of Checkered Illusion: Step 8

step 9 of 19

Another helpful tip that most new PS users are not aware of is that you can rename the layers in the layer pallet. This is not a technique used for a project with fewer layers but more useful for multiple layering. You can change the name of each layer by simply double clicking next to it where it says "layer 1, 2, etc". For this example, I have named the checkered layer "Checkers" and the background layer "Background".

Creation of Checkered Illusion: Step 9

step 10 of 19

Now you are ready to fill the rest of the canvas with the checkered layer. Duplicate the checkered layer using the "Move" tool and select alt and drag to once again duplicate the existing checkered layer. This time, instead of merging layers in the “layer” menu, flatten the image. You will not need the background layer anymore.

Creation of Checkered Illusion: Step 10

step 11 of 19

I am now going to add the font. I select the “horizontal type tool” and hit Ctrl/T to bring up the font menu. I then select a sizeable font type and size and position it to where it will be centered.

Creation of Checkered Illusion: Step 11

step 12 of 19

At this point, the font fits the width of the canvas but not the height. I want to try and maximize the font to the canvas. So I select the "move" tool and once again hit Ctrl/t to free transform the font to the size of the canvas. (Hint: you must make sure you select another tool besides the “Type” tool to initiate the “free transform” menu hitting Ctrl/T)

Creation of Checkered Illusion: Step 12

step 13 of 19

Now I’m ready to add the effect and mask the font to add the checkered pattern to it, creating the effect. Select the “magic wand” tool, located below the “move” tool as seen in the screen shot below.

Creation of Checkered Illusion: Step 13

step 14 of 19

Then return to the layer pallet and make the background layer and checkered layer invisible, once again by selecting the eye icon next to each layer, so that only the font layer is visible. Make sure you select the font layer before using the “Magic Wand” tool.

Creation of Checkered Illusion: Step 14

step 15 of 19

Select a section outside the font. Then right click and “Select Inverse” from the magic want menu. You have now created a mask to make a checkered font.

Creation of Checkered Illusion: Step 15

step 16 of 19

Now to finish the masking effect, I go back to my layer pallet and select the eye icon next to the font layer and make the checkered layer visible again. As you can see, the font layer mask is still visible.

Creation of Checkered Illusion: Step 16

step 17 of 19

This time, make sure that you have the checkered layer selected and hit Ctrl/c (to copy the selection) and Ctrl/V (to paste the selection) onto the canvas. This will make a new layer with just the checkered pattern on the font, which you can see by making the background checkered invisible on the layer pallet, once again by selecting the eye icon next to it. You can now see by the screen shot below that you have a checkered font now.

Creation of Checkered Illusion: Step 17

step 18 of 19

Our next step will be to adjust the background to offset the checkered pattern with the font checkered pattern. Select the checkered layer pattern with the “Move” tool and slide to the left to match up the corners of the Illusion font checkered pattern until corners match up as seen in the screen shot below. You can delete the original font layer at this point.

Creation of Checkered Illusion: Step 18

step 19 of 19

Our final step will be to duplicate the background layer, to shift to the right to fill the rest of the canvas and then once again, select the Layers menu and select “Flatten Image”. (Hint: you can duplicate any layer by hitting Ctrl/J)

And there you have it. I hope this helped with anyone just learning to use Photoshop for the first time. I feel this is a good guide for learning to use a simple masking technique.

Creation of Checkered Illusion: Step 19

Final result

Creation of Checkered Illusion: Final Result

LOGIN or REGISTER FOR FREE
to rate this guide and create your own guides.

Votes


uservoted
erikuri
migue1ito
Score:
10


Comments

avatar DanLundberg

There are usually multiple ways to do everything. For example, after Step 5, you could draw a rectangular marquis around your mini 2x2 checkerboard, go to Edit/Define Pattern/name it 'checks' or whatever if you want/OK, and then go to Edit/Fill using Pattern and selecting the Custom Pattern you just created from the drop-down choices. Voila--you have jumped ahead to Step 10! Also, after Step 17 you could just go to Image/Adjustments/Invert and you'd be done. (BTW at Step 17, Ctrl+J does in one keystroke what you did in two with Ctrl+C followed by Ctrl+V.)

(5 years and 3467 days ago)
author [banned] says:

Yes I know there are multiple ways to do just about everything. I just felt this contest entry would make for a great (simple explanation) to do a mask but I will see if I can't improve it if I can remove a step. I thank you very much for your critique. Thanks again.

(5 years and 3466 days ago)