
Original image
step 1 of 21
Cut out two of the fingers from the source pic.

step 2 of 21
Pasted the biggest of the fingers over the piano background.

step 3 of 21
Here I added the second finger, copied and flipped it onto both sides. I cut out and rotated down the top part of the left "finger," and did alot of eraser work to blend all the fingers together.

step 4 of 21
Used some puppet warp on the main finger so that the "player" is more hunched over the piano.

step 5 of 21
Here I decided that the folded-up music stand looked ugly (for some eccentric reason). I just cut off the bottom half of the stand and pasted it on a slightly lower level, as if it were folded down...

step 6 of 21
...and deleted the old one with content-aware fill and healing brush. I also added a slight drop shadow.

step 7 of 21
This is the first of two pictures I took of my own hands, which I will use as the piano hand's...hands. Yeah. The hand's hands.

step 8 of 21
Second picture for the second hand...

step 9 of 21
Adding in the hands using alot of image adjustments, masking, and erasing.

step 10 of 21
And the hands are pretty much done. Took awhile to get their skin texture the same as the player's.

step 11 of 21
Here I realized that one of the keys should be pressed if I wanted an "action shot" so to speak. I cut out one of the black keys on which the left hand rested and warped and erased it until it was depressed enough. (*sob!*)

step 12 of 21
Then I just used the clone stamp to fill in the old key on a lower layer.

step 13 of 21
Now I cut out the finger which would press the key and warped it to fit.

step 14 of 21
Next is shadow time. I painted in two or three layers of shadows, each at slightly different opacities. The right hand shadow was made simply by selecting the hand, filling the selection with black, and using guassian blur. Oh, and changing the layer opacity to the same level as the rest, of course.

step 15 of 21
I added a blue/dark blue gradiant map over the entire image and set it to overlay, then reduced opacity. Also added some curves and saturation adjustments layers. Curves=darkened, saturation=desaturated.

step 16 of 21
Here I realized that the right hand's light source was wrong, so I was forced to take another photo.

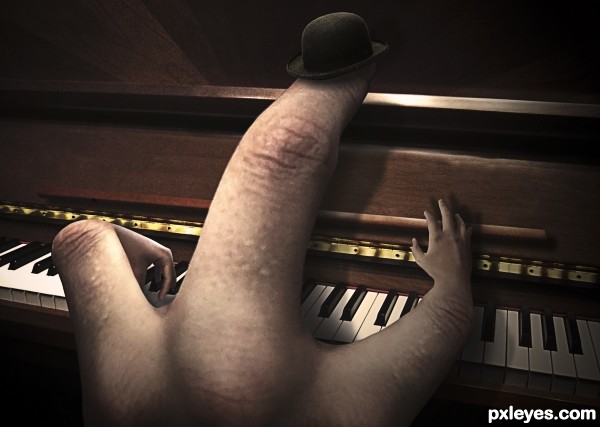
step 17 of 21
Replaced the right hand, as well as added a quaint little English bowler hat with another two layers of shadow. Note that the hat does not fall under the gradiant map layer, else it would be too dark.

step 18 of 21
Now some more curves adjustments. Added in two more curves layers, one very dark and the other very light. Filled both of their masks with black to null them, then painted over the masks with a very light brush to bring out either shadow or highlight on the player and its hands.

step 19 of 21
Ridiculously small detail here: just cut out the hinges of the piano onto a seperate layer, duplicated the main hand layer, put it over the hinges as a clipping mask and set the blend mode to overlay. This is just to mimic the reflection of flesh in the metal.

step 20 of 21
Almost done. I merged all the layers and added some lighting effects from the top left, then added a high-passed layer with overlay.

step 21 of 21
Finally, I opened the finished picture in Camera RAW plug-in and added some nice vingetting, as well as a warming filter.

Final result
Pxleyes
Photography and photoshop contests
We are a community of people with
a passion for photography, graphics and art in general.
Every day new photoshop
and photography contests are posted to compete in. We also have one weekly drawing contest
and one weekly 3D contest!
Participation is 100% free!
Just
register and get
started!
Good luck!
Follow us:


© 2015 Pxleyes.com. All rights reserved.