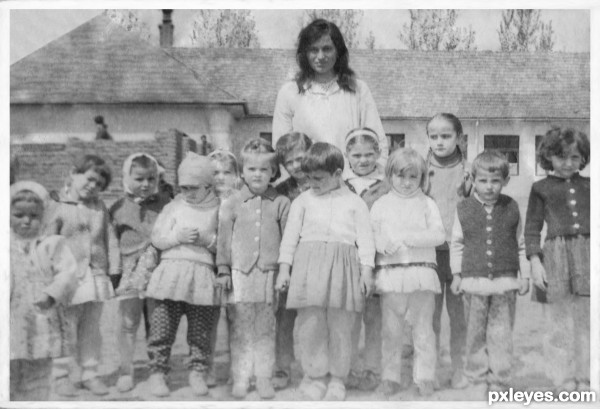
I have reconstructed this picture by using the patch tool and, as I am showing here. by copying other parts of the same photo sometimes and shape them so they would fit in. In some cases I have also edit the brightness/contrast of the layers to make them match better. I have erased then ofcourse the parts that doesnt fit with the photo at that spot and blended the copied part completely with the rest of the picture.
step 2 of 11
After working a little bit I changed the brightness contrast of the whole photo so everything would become more clear to see. This was handy during the work in progress but also in the end result it made the picture look better.
step 3 of 11
Here another example of how I ued the copy paste technique to reconstruct part of the photo. Mind you, I have only used very small parts to copy for reconstruction so the original picture would remain the same as much as possible without too much altering.
Image 5 here shows the uneditted shoulder of the woman.
Image 6 shows you the shoulder after I have used the patchtool. I was not happy with the result and tried this copy technique.
you can see the part I have selected that I used to copy.
Image 7. I have copy pasted a small part of the shoulder, I flipped it and turned it so it would fit nicely. (mind ya I use round shapes to copy paste because those lines of the edges are often easier to make invissible since they are not straight).
At image 8 you can see I changed the brightness/contrast to make it fit better at that particular spot.
And finally at image 9 you see the result after I have erased the edges and have finished with this particular spot.
step 4 of 11
Ive done the same copy paste technique also with this childs legs. To make sure i put the copied part on the right spot I temporarely changed the opacity of the top layer (the copied part). After placed it right I put the opacity back to normal. Here i have adjusted the shape a little bit as you can see.
step 5 of 11
One of the childrens faces in this photo is very damaged and very hard to reconstruct realistic. So I decided to use the face of one of the other kids. I dont have any steps of how I made it fit in, but that face was a long project of trial and error untill I was satisfied.
step 6 of 11
The roof, I mainly fixed the roof copy/paste the roof from the other side.
Image 13 shows I used two times the same copy to match the roofline.
Image 14, I have erased the edge between the two copies so they blend well together.
ON image 15 u see that I have erased the edge of one of the circles to blend in. and also I have cut the parts off here that I didnt needed to reconstruct the roofline.
Image 16 shows the result after its cut off.
At Image 17 I have reconstructed the sky in that corner aswell and made the copies on the roofline blend in completely. I also started with the damaged part at the bottom edge of the roof using again the copy paste technique.
Image 18 has that roof part almost completely restored.
step 7 of 11
Here an example where I have used the patchtool.
step 8 of 11
The result as I have it when Im almost done. Just needs a few more restorations
step 9 of 11
'Most of the reconsturction is done. Now I started to work on the edge of the photo, I have used a part of the original edge. Simply changed the size n length.
step 10 of 11
here you see one of the sides being placed. After I finished all the edges I used the patchtool to cover the lines of the edges where they would cross eachother in the corners. I have also straightened the photo. I thoguht it comes out better that way.
step 11 of 11
made the bottom part of the photo. the legs part a little darker, here you see how it was before I changed the brightness/contrast of the bottom part.